#Virtual Disk Format
Explore tagged Tumblr posts
Visit Tumblr Blog
Explore Tumblr blogs with no restrictions, modern design and the best experience.
Last Seen Tumblr Blogs


Fun Fact
In February 2021, Tumblr had 518.6 million blog accounts.
Text
WHY DO PLANETS SPIN??
Blog#424
Saturday, August 3rd, 2024.
Welcome back,
Stars and planets form in the collapse of huge clouds of interstellar gas and dust. The material in these clouds is in constant motion, and the clouds themselves are in motion, orbiting in the aggregate gravity of the galaxy. As a result of this movement, the cloud will most likely have some slight rotation as seen from a point near its center.

This rotation can be described as angular momentum, a conserved measure of its motion that cannot change. Conservation of angular momentum explains why an ice skater spins more rapidly as she pulls her arms in. As her arms come closer to her axis of rotation, her speed increases and her angular momentum remains the same. Similarly, her rotation slows when she extends her arms at the conclusion of the spin.

As an interstellar cloud collapses, it fragments into smaller pieces, each collapsing independently and each carrying part of the original angular momentum. The rotating clouds flatten into protostellar disks, out of which individual stars and their planets form.

By a mechanism not fully understood, but believed to be associated with the strong magnetic fields associated with a young star, most of the angular momentum is transferred into the remnant accretion disk. Planets form from material in this disk, through accretion of smaller particles.
In our solar system, the giant gas planets (Jupiter, Saturn, Uranus, and Neptune) spin more rapidly on their axes than the inner planets do and possess most of the system's angular momentum. The sun itself rotates slowly, only once a month.

The planets all revolve around the sun in the same direction and in virtually the same plane. In addition, they all rotate in the same general direction, with the exceptions of Venus and Uranus. These differences are believed to stem from collisions that occurred late in the planets' formation. (A similar collision is believed to have led to the formation of our moon.)
Originally published on https://www.scientificamerican.com
COMING UP!!
(Wednesday, August 7th, 2024)
"HOW FAST IS OUR UNIVERSE MOVING??"
#astronomy#outer space#alternate universe#astrophysics#universe#spacecraft#white universe#space#parallel universe#astrophotography
130 notes
·
View notes
Note
how does the Oblivion Remake work?
HI YES SO this is all speculation. i haven't looked at anything online apart from confirmation that it's the gamebryo engine for the programming and unreal engine for the rendering/graphics so there's probably a better explanation out there maybe??
but yesyes the way the remake works is that the coding/programming is all done on the gamebryo engine,, and UE handles visuals, so it's basically gamebryo telling UE 'hi render this here' and UE does that. it looks like it's the original code with a big update (esp with levelling) from how the file structure is internally and the fact that the only console commands/cheats that work are from oblivion? like 'newer' cheats from skyrim/fallout 4/starfield don't work when put into the console. (unfortunately, any cheats related to visuals, like 'tm' for toggle menu or 'tlb' for ambient lighting don't work, since UE is the renderer)
also now i understand why virtuos always had offers for technical artists for a few years, it was to bridge the two engines together 😭 OH SPEAKING OF TECH ART. i'm pretty sure it's also the same map? most games' maps are generated/stored as a heightmap, like this one

white = peaks, black = valleys/water
from how the terrain is extreme in game, it's very likely they kept the same height map from 2006, and refined what needed to be refined (navmesh, weird fucky spots, more rocks, more vegetation). i'm not sure how vegetation and terrain paint was handled in the original game, but in unreal engine, it's just a matter of loading a new texture or mesh over the previous one, and everything will be kept in the same place but just updated (eg: you place a temporary cube to see where the grass will be, then replace that mesh in three clicks with grass, and all the cubes will be updated to grass). my proof is uhhh this. taken from reddit (from u/numerouswishbone1758). the trees are in the same spot/formation which is neat :)


i think that this remake is a really smart way of going at it, because it's like updating a pc kind of? the internals are kept, given a little update and a clean-up, but in a fresh new case :)
the only gripe i have is the storage space BUT there is literally 16 times the detail (going from 1k textures to 4k, which are both extreme examples but present in the files) which takes a lot of space (dds files are already compressed) . back then storage space was limited to a disk, but now? it's all virtual baby who cares about physical storage limits. and i also dont like how dry humanoids look in this. either they didn't use a roughness map and set the roughness to 1, OR they used UE's skin material which would make sense i mean the thing is right there. might as well use it. ngl i think that starfield's graphics would've worked well for oblivion, since it's realistic but stylised enough to not be uncanny? and og oblivion is cartoony so it would've merged well but all is good and fine :)
3 notes
·
View notes
Text
Say, for the sake of argument, you want to make a bad programming language. Why would you do this?
Well, for instance, you might get your hands on a book of scripts to generate ephemera for celestial events, only to find out it was written for Microsoft QuickBasic for Macintosh System 7. You quickly discover that this particular flavor of BASIC has no modern interpreter, and the best you can do is an emulator for System 7 where you have to mount 8 virtual floppy disks into your virtual system.
You could simply port all the scripts to another BASIC, but at that point you might as well just port them to another langauge entirely, a modern language.
Except QuickBasic had some funky data types. And the scripts assume a 16-bit integer, taking advantage of the foibles of bitfutzery before converting numbers into decimal format. BASIC is very particular -- as many old languages are -- about whitespace.
In addition to all this, BASIC programs are not structured as modern programs. It's structured to be written in ed, one line at a time, typing in a numbered index followed by the command. There are no scopes. There are no lifetimes. It's just a loose collection of lines that are hopefully in a logical order.
So sure, I could port all these programs. But I'm sure to make mistakes.
Wouldn't it just be easier, some basal part of my brain says, to write your own language that some some modern ameneties, that you compile for your own laptop, that kind of acts like BASIC? A language where you just have to translate particular grammar, and not the whole structure of the program?
Of course it's not easier. But I'm already too far in to quit now.
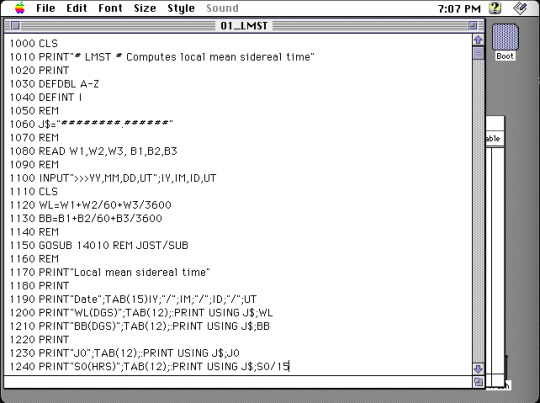
Memory
Who doesn't love manual memory layout?
In QuickBasic, memory is "kind of" manual. The DEFINT and DEFDBL keywords let you magically instantiate types based on their first letter. I don't know how you deallocate things, because all the scripts in this book finish quickly and don't hang around to leak a lot.
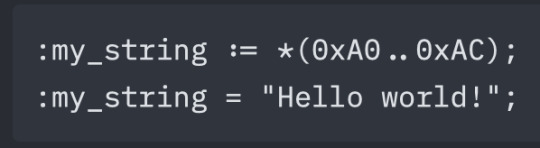
In QuickBasic, this looks like

I guess that the second statement just overrides the first.
There is no stack in a BASIC program, so there will be no stack in my language. Instead you just give names to locations.

creates a symbol named age and makes it refer to 0x1F. The pointer operator should be obvious, and the walrus means we're defining a symbol (to be replaced like a macro), not doing a value assignment during the execution of the program. Now we can assign a value.
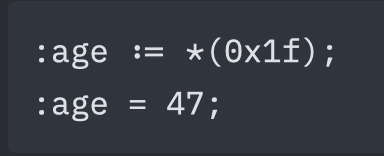
Atoms infer types. age knows it's an int.
You cannot assign a new type to an atom.
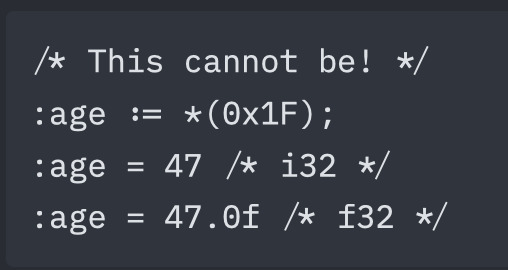
However, you can cast between types by creating two atoms at the same address, typed differently.
The language does not convert these, it simply interprets the bits as the type demands.
Larger types
Not all types are a single word. Therefore, you can use the range operator .. to refer to a range of addresses.
Note that strings are stored with an extra byte for its length, instead of null-terminating it. Assignment of a string that is too long will result in a compilation error.
Next and Auto
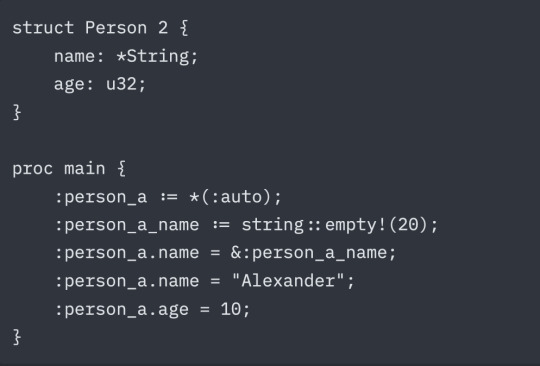
There are also two keywords to make the layout of memory easier. The first is :next which will place the span in the next available contiguous location that is large enough to hold the size required. The second is :auto. For all :auto instances, the compiler will collect all these and attempt to place them in an intelligent free location. :auto prefers to align large structs with 64-word blocks, and fills in smaller blocks near other variables that are used in the same code blocks.
String Allocation
Strings come with a macro to help automatically build out the space required:

This is equivalent to:

That is, a string with capacity 5, a current size of 0, and zeroes (null char) in all spots. This helps avoid memory reuse attacks. ZBASIC is not a secure language, but this is still good practice.
There is also another macro that is similar to a "string literal".

Verbose and annoying! Just like BASIC.
Array Allocation
Likewise, arrays have a similar macro:
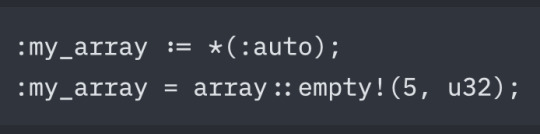
Which expands in a similar way as strings, with a capacity word and size word. The difference here is that the type given may change the actual size of the allocation. Giving a type that is larger than a single word will result in a larger array. For instance, f64 takes up two words some systems, so array::empty!(5, f64) will allocate 10 words in that case (5 * 2). Larger structs will likewise take up even more space. Again, all this memory will be zeroed out.
Allocation order
As an overview, this is the order that memory is assigned during compilation:
Manual Locations -> Next -> Auto
Manual locations are disqualified from eligibility for the Next and Auto phases, so a manual location will never accidentally reference any data allocated through :next or :auto.
Here is an example:
This produces the initial layout:

Which, after the code is run, results in the memory values:

Note that types are not preserved at runtime. They are displayed in the table as they are for convenience. When you use commands like "print" that operate differently on different types, they will be replaced with one of several instructions that interpret that memory as the type it was at compile-time.
Truly awful, isn't it?
3 notes
·
View notes
Text
Linux Life Episode 86
Hello everyone back to my Linux Life blog. I admit it has been a while since I wrote anything here . I have continued to use EndeavourOS on my Ryzen 7 Dell laptop. If I any major incidents had came up I would have made an entry.
However nothing really exciting has transpired. I update daily and OK have had a few minor issues but nothing that couldn't be sorted easily so not worth typing up a full blog just for running a yay command which sorted things out.
However given it's March, which some You-tubers and content creators have been running with the hashtag of #Marchintosh in which they look at old Mac stuff.
So I decided to run some older versions of Mac OS using VMWare Workstation which is now free for Windows, Mac and Linux.
For those not up with the technology of Virtual Machines basically the computer creates a sandbox container which pretends to be a certain machine so you can run things like Linux and MacOS using a software created environment.
VMWare Workstation and Oracle Virtualbox are Type 2 Hypervisors as they are known which create the whole environment using software machines which you can configure. All drivers are software based.
Microsoft Hyper-V, Xen and others such as QEMU are Type 1 Hypervisors which as well as having the various environments have software drivers some can use what they call "bare metal" which means it can see and use your actual GPU meaning you can take advantage of video acceleration. It also can give bare metal access to keyboards and mice. These take a lot more setup but work slightly quicker than Type 2 once they are done.
Type 1 systems like Qemu and Bochs may also allow access to different CPU types such as SPARC, PowerPC so you can run alternative OS like Solaris, IRIX and others.
Right now i have explained that back to the #Marchintosh project I was using VMWare Workstation and I decided to install 2 versions of Mac OS.
First I installed Mac OS Catalina (Mac OS X 10.15) now luckily a lot of the leg work had been taken out for me as someone had already created a VMDK file (aka virtual Hard drive) of Catalina with AMD drivers to download. Google is your friend I am not putting up links.
So first you have to unlock VMWare as by default the Windows and Linux versions don't list Mac OS. You do this by downloading a WMWare unlocker and then running it. It will make patch various files to allow it to now run MacOS.
So upon creating the VM and selecting Mac OS 10.15 from options you have to first setup to install the OS later and then when it asks to use a HD point it towards the Catalina AMD VDMK previously downloaded (keep existing format). Set CPUs to 2 and Cores to 4 as I can. Memory set to 8GB, Set networking to NAT and everything else as standard. Selecting Finish.
Now before powering on the VM as I have an AMD Ryzen system I had to edit the VM's VMX file using a text editor.
cpuid.0.eax = “0000:0000:0000:0000:0000:0000:0000:1011” cpuid.0.ebx = “0111:0101:0110:1110:0110:0101:0100:0111” cpuid.0.ecx = “0110:1100:0110:0101:0111:0100:0110:1110” cpuid.0.edx = “0100:1001:0110:0101:0110:1110:0110:1001” cpuid.1.eax = “0000:0000:0000:0001:0000:0110:0111:0001” cpuid.1.ebx = “0000:0010:0000:0001:0000:1000:0000:0000” cpuid.1.ecx = “1000:0010:1001:1000:0010:0010:0000:0011” cpuid.1.edx = “0000:0111:1000:1011:1111:1011:1111:1111” smbios.reflectHost = "TRUE" hw.model = "iMac19,1" board-id = "Mac-AA95B1DDAB278B95"
This is to stop the VM from locking up as it will try and run an Intel CPU setup and freeze. This is the prevention of this happening by making it think its a iMac 19,1 in this case.
Now you need to create a harddrive in the VM settings to install the OS on by editing the settings in VMWare and adding a hard drive in my case 100GB set as one file. Make sure it is set to SATA 0:2 using the Advanced button.
Now power on the VM and it will boot to a menu with four options. Select Disk Utility and format the VMware drive to APFS. Exit Disk Utility and now select Restore OS and it will install. Select newly formatted drive and Agree to license.
It will install and restart more than once but eventually it will succeed. Setup language, Don't import Mac, skip location services, skip Apple ID, create account and setup icon and password. don't send Metrics, skip accessibility.
Eventually you will get a main screen with a dock. Now you can install anything that doesn't use video acceleration. So no games or Final Cut Pro but can be used a media player for Youtube and Logic Pro and Word processing.
There is a way of getting iCloud and Apple ID working but as I don't use it I never did bother. Updates to the system are at your own risk as it can wreck the VM.
Once installed you can power down VM using the Apple menu and remove the Catalina VMDK hard drive from the settings. It provide all the fixed kexts so keyboards, mice and sound should work.
If you want video resolution you can install VMware Tools and the tools to select are the ones from the unlocker tools.
Quite a lot huh? Intel has a similar setup but you can use the ISOs and only need to set SMC.version="0" in the VMX.

For Sonoma (Mac OS 14) you need to download OpenCore which is a very complicated bootloader created by very smart indivials normally used to create Hackintosh setups.
It's incredibly complex and has various guides the most comprehensive being the Dortania Opencore guide which is extensive and extremely long.
Explore so at your own risk. As Sonoma is newer version the only way to get it running on AMD laptops or Desktops in VMWare is to use Opencore. Intel can do fixes to the VMX to get it work.
This one is similar to the previous I had to download an ISO of Sonoma. Google is your friend but here is a good one on github somewhere (hint hint). In my case I downloaded Sonoma version 14.7_21H124 (catchy I know).
I also had to download a VDMK of Opencore that allowed 4 cores to be used. I found this on AMD-OSX as can you.
The reason I chose this ISO as you can download Sequioa one. I tried Sequioa but could not get sound working.
So for this one create VM , Select Mac OS 14, install operating system later. Existing OS select Opencore VDMK (keep existing format), set CPU to 1 and cores to 4. Set Netwoking as Bridged everything else as normal. Finish
Now edit settings on VM. On CD-Rom change to image and point to downloaded Sonoma ISO. Add Second hard drive to write to once again I selected 100GB one file. Make sure it is set to SATA 0:2 using the Advanced button. Make sure Opencore is set to SATA 0:0 also using same button.
Now Power the VM. It will boot to a menu with four options. Select Disk Utility and format the VMware drive to APFS. Exit Disk Utility and now select Install OS and it will install. Select newly formatted drive and Agree to license.
The System will install and may restart several times if you get a halt then Restart Guest using the VMware buttons. It will continue until installed.
Setup as done in Catalina turning off all services and creating account. Upon starting of Mac you will have a white background.
Go to System Settings and Screen Saver and turn off Show as Wallpaper.
Now Sonoma is a lot more miserable about installing programs from the Internet and you will spend a lot of time in the System setting Privacy and Security to allow things.
I installed OpenCore Auxilary Tools and managed to install it after the security nonsense. I then turned on Hard Drives in Finder by selecting Settings.
Now open OPENCORE and open EFI folder then OC folder. Start OCAT and drag config.plist from folder to it. In my case to get sound I had to use VoodooHDA but yours may vary.
The VoodooHDA was in the Kernel tab of OCAT I enabled it and disabled AppleALC. Save and exit. Reboot VM and et voila I had sound.
Your mileage may vary and you may need different kexts depending on soundcard or MAC OS version.
Install VMTools to get better Screen resolution. Set Wallpaper to static rather than dynamic to get better speed.
Close VM edit settings and remove CD iso by unticking connected unless you have a CD drive I don't. DO NOT remove Opencore as it needs that to boot.
And we are done. What a nightmare but fascinating to me. If you got this far you deserve a medal. So ends my #Marchintosh entry.
Until next time good luck and take care
2 notes
·
View notes
Text

Sombrero Galaxy dazzles in new Webb images and video
A new mid-infrared image from the NASA/ESA/CSA James Webb Space Telescope features the Sombrero galaxy, also known as Messier 104 (M104). The signature, glowing core seen in visible-light images does not shine, and instead a smooth inner disk is revealed.
The sharp resolution of Webb's MIRI (Mid-Infrared Instrument) also brings into focus details of the galaxy's outer ring, providing insights into how the dust, an essential building block for astronomical objects in the universe, is distributed. The galaxy's outer ring shows intricate clumps in the infrared for the first time.
Researchers say the clumpy nature of the dust, where MIRI detects carbon-containing molecules called polycyclic aromatic hydrocarbons, can indicate the presence of young star-forming regions.
However, unlike some galaxies studied with Webb—including Messier 82, where 10 times as many stars are born as in the Milky Way galaxy—the Sombrero galaxy is not a particular hotbed of star formation. The rings of the Sombrero galaxy produce less than one solar mass of stars per year, in comparison to the Milky Way's roughly two solar masses a year.
The supermassive black hole at the center of the Sombrero galaxy, also known as an active galactic nucleus (AGN), is rather docile, even at a hefty 9-billion-solar masses. It's classified as a low luminosity AGN, slowly snacking on infalling material from the galaxy, while sending off a bright, relatively small jet.
Also within the Sombrero galaxy dwell some 2,000 globular clusters, a collection of hundreds of thousands of old stars held together by gravity. This type of system serves as a pseudo-laboratory for astronomers to study stars—thousands of stars within one system with the same age, but varying masses and other properties is an intriguing opportunity for comparison studies.

In the MIRI image directly above, galaxies of varying shapes and colors litter the background of space. The different colors of these background galaxies can tell astronomers about their properties, including how far away they are.
The Sombrero galaxy is around 30 million light-years from Earth in the constellation Virgo.
Stunning images like this, and an array of discoveries in the study of exoplanets, galaxies through time, star formation, and our own solar system, are still just the beginning. Recently, scientists from all over the world converged—virtually—to apply for observation time with Webb during its fourth year of science operations, which begins in July 2025.
General Observer time with Webb is more competitive than ever. A record-breaking 2,377 proposals were submitted by the 15 October 2024 deadline, requesting about 78,000 hours of observation time. This is an oversubscription rate—the ratio defining the observation hours requested versus the actual time available in one year of Webb's operations—of around 9 to 1.
The proposals cover a wide array of science topics, with distant galaxies being among the most requested observation time, followed by exoplanet atmospheres, stars and stellar populations, and then exoplanet systems.
youtube
TOP IMAGE: This image compares the view of the famous Sombrero Galaxy in mid-infrared light (top) and visible light (bottom). The James Webb Space Telescope’s MIRI (Mid-Infrared Instrument) reveals the smooth inner disk of the galaxy, while the Hubble Space Telescope’s visible light image shows the large and extended glow of the central bulge of stars. Credit: European Space Agency
LOWER IMAGE: The NASA/ESA/CSA James Webb Space Telescope recently imaged the Sombrero galaxy with its MIRI (Mid-Infrared Instrument), resolving the clumpy nature of the dust along the galaxy’s outer ring. The mid-infrared light highlights the gas and dust that are part of star formation taking place among the Sombrero galaxy’s outer disk. The rings of the Sombrero galaxy produce less than one solar mass of stars per year, in comparison to the Milky Way’s roughly two solar masses a year. It’s not a particular hotbed of star formation. Credit: NASA, ESA, CSA, STScI
youtube
youtube
3 notes
·
View notes
Text
Download Ableton Live 11.3.21 Suite

Are you ready to elevate your music production to the next level? Look no further than Ableton Live 11.3.21 Suite, the industry-leading software trusted by professionals worldwide. With its cutting-edge features and intuitive interface, this latest version is a game-changer for musicians, producers, and DJs alike.
Unparalleled Performance and Compatibility
Powered by Apple Silicon and Intel processors, Ableton Live 11.3.21 Suite offers seamless performance on both Mac and PC platforms. Whether you're using the latest macOS or Windows 10/11, rest assured that this software will deliver optimal results. Say goodbye to compatibility issues and experience smooth operation with every session.
Lifetime Activation and Access
When you invest in Ableton Live 11.3.21 Suite, you're not just getting a piece of software – you're gaining access to a world of endless possibilities. Enjoy lifetime activation and unrestricted downloading privileges, ensuring that you can always access the latest updates and features. With Ableton's commitment to innovation, you'll never be left behind.
Feature-Rich Functionality
Discover a wealth of tools and capabilities designed to fuel your creativity. From powerful MIDI sequencing to flexible audio recording and editing, Ableton Live 11.3.21 Suite has everything you need to bring your musical ideas to life. Experiment with virtual instruments, effects, and sound libraries to craft your signature sound with ease.
Effortless Installation and Setup
Gone are the days of lengthy installation processes. With Ableton Live 11.3.21 Suite, you can enjoy instant download and hassle-free installation. Simply follow the straightforward instructions, and you'll be up and running in no time. Whether you're a seasoned pro or a newcomer to music production, getting started has never been easier.
System Requirements
Mac: Compatible with macOS 11 and all new versions.
PC: Compatible with Windows 10 and 11.
Processor: Apple Silicon or Intel processor.
Storage: 5GB hard disk or external drive.
Plugin Formats: VST2, VST3, AU, and standalone host.
Download Now and Elevate Your Music Production
Ready to take your music production to new heights? Don't miss out on the opportunity to download Ableton Live 11.3.21 Suite from saleonplugins.com. With its unmatched performance, lifetime activation, and feature-rich functionality, this software is a must-have for any serious musician or producer. Transform your musical vision into reality and experience the power of Ableton Live today!
#AbletonLive11#MusicProduction#AudioSoftware#DigitalAudioWorkstation#MusicSoftware#CreativeTools#MusicProducers#SoundDesign#AbletonSuite#MusicTech
2 notes
·
View notes
Text
okay, done with the liveblog for the night. I will probably finish the game tomorrow. if you want to watch a playthrough, click here. beneath the cut is the instructions my friend Marsh put together for how to play the game. he's the only reason I'm able to right now! I will say, however, that I had additional tech issues with getting the game set up. if you run into an error, you can message me and I'll see if I can help with it. I had to download new software from the Microsoft store.
This guide is for Windows. I have no experience with Macs, so I cannot help.
You need to download multiple files to run the Utena game. I included links to the downloads I used:
1. Utena game files (https://www.dropbox.com/s/s9kjp7smf1izh6g/Utena_Sega1.rar?dl=0, https://www.dropbox.com/s/6llr2tcsaybmysh/Utena_Sega2.rar?dl=0)
The original Utena game was split into two discs, so the downloadable files available on the internet are also split in two. You will need to download both. There might be downloads where people have managed to combine the two disks into one, but I don't know how trustworthy they are.
2. Virtual Clonedrive (https://www.elby.ch/en/products/vcd.html)
This software takes game isos and "mounts" them into a virtual drive. This is how you trick your computer into thinking that you have inserted the game disk.
3. SSF 0.12 beta R3 (https://emutopia.com/index.php/emulators/item/297-sega-saturn/416-ssf scroll and select SFF 0.12 beta R3)
This is the emulator. You can use other versions of this emulator but I have heard that this one is most reliable for this game.
4. Translator (https://mega.nz/file/ywtDzDza#ZXNxaD4q2V-PBY4w126FHCqOkVmnWzGWeIOJQkbrzz4)
Translates game into english. Really easy to use, and comes with instructions that can help guide you through the emulation process. Note: I cannot get the name portion to work and this doesn't translate everything, just the most important parts.
5. Winrar (https://www.win-rar.com/start.html?&L=0)
Several files download as .rar and will not open correctly without this.
INSTRUCTIONS:
1. Virtual Clonedrive downloads as an .exe file. Open file and finish the install and it will be done.
2. Translator files and game files are .rar format. Make a folder somewhere on computer, with a name that is easy for you to find or remember. Extract the Utena game files, and translator files to this folder. Translator will not work if all these files are not in same folder.
3. Emulator files are in a zip folder. Extract to somewhere easy to find. Doesn't need to be in same location as translator and game files.
4. Open folder with game and translator files. There is a word file called Instructions. Open that and follow what is written there to translate the game. If done correctly, you will have two files that say Utena_English1 and Utena_English2.
5. Right click Utena_English1 and click "Mount".
6. Go to the extracted emulator files. Double click SSF application. The Utena game should start playing once this application is opened.
7. The controls are kinda weird. The arrow keys move the cursor around, enter is the start/menu button, and z is the select button.
#zeal plays utena#i would recommend at least watching a playthru bc it's a fun game#v much in the spirit of the show#like. not fun in a video game way but fun for fans of the characters#the game itself isnt v interactive
6 notes
·
View notes
Text
Performance Optimization Techniques for Mobile Application in 2025

Introduction As mobile applications continue to evolve, users' expectations for performance have heightened. In 2025, delivering a seamless and responsive mobile experience is paramount for user retention and satisfaction. This article explores advanced strategies and best practices for optimizing mobile app performance, ensuring they meet the demands of modern users.
Efficient Code Practices
The foundation of any high-performing mobile application lies in efficient coding practices. Writing clean, optimized code not only improves performance but also enhances maintainability and scalability. Developers should focus on minimizing resource consumption by avoiding unnecessary computations and optimizing algorithms. Implementing asynchronous programming techniques can prevent UI blocking, ensuring smooth user interactions. Additionally, code splitting allows for loading only the necessary parts of the application, reducing initial load times and conserving system resources.
Regular code reviews and profiling are essential to identify performance bottlenecks and areas for improvement. Utilizing tools like Android Profiler and Xcode Instruments can provide insights into CPU, memory usage, and rendering performance, enabling developers to make data-driven decisions to enhance application performance.
Optimizing Network Calls
Network efficiency is crucial for mobile applications, especially in regions with varying connectivity. Optimizing network calls can significantly improve application responsiveness and reduce data usage. Developers should aim to minimize the number of network requests by consolidating API calls and utilizing batch processing where possible. Implementing data compression techniques, such as gzip, can reduce payload sizes, leading to faster data transmission and lower bandwidth consumption.
Caching strategies play a vital role in enhancing network efficiency. By storing frequently accessed data locally, applications can reduce the need for repeated network requests, resulting in faster load times and improved user experiences. Developers should implement appropriate caching mechanisms, such as memory and disk caching, to ensure that data is readily available when needed.
Image and Asset Optimization
Large images and assets can significantly impact mobile application performance, leading to increased load times and higher memory usage. To optimize images, developers should use modern formats like WebP or AVIF, which offer superior compression without compromising quality. Implementing lazy loading techniques ensures that images are loaded only when they are about to be displayed, conserving memory and improving load times.
Responsive design is essential to deliver optimal user experiences across various devices. Serving appropriately sized images based on the device's screen resolution prevents unnecessary data usage and ensures that images are displayed correctly. Tools like ImageMagick and TinyPNG can assist in compressing and optimizing images without sacrificing quality.
UI/UX Enhancements
A responsive and intuitive user interface is crucial for user retention and satisfaction. Developers should focus on creating smooth animations and transitions that enhance the user experience without introducing performance overhead. Utilizing hardware-accelerated animations can offload rendering tasks to the GPU, resulting in smoother and more efficient animations.
Efficient layout design is essential to minimize overdraw and unnecessary view hierarchies. By optimizing the view hierarchy and reducing the number of nested views, developers can improve rendering performance and reduce memory usage. Implementing pagination and virtualized lists can enhance the performance of applications that display large datasets, ensuring that only visible items are rendered at any given time.
Battery and Memory Management
Efficient resource management is critical to extend device battery life and prevent application crashes. Developers should regularly monitor and fix memory leaks to prevent excessive memory consumption and ensure application stability. Utilizing tools like LeakCanary and Xcode Instruments can assist in detecting and resolving memory leaks during development.
Background task optimization is essential to conserve battery life and reduce resource usage. Developers should limit background processes and use appropriate scheduling mechanisms to ensure that background tasks are executed efficiently. Implementing strategies like WorkManager for deferred tasks and JobScheduler for periodic tasks can help manage background operations effectively.
Performance Monitoring and Analytics
Continuous monitoring allows developers to identify and address performance issues proactively. Implementing real-time analytics tools provides insights into application performance metrics, enabling developers to make informed decisions to enhance performance. Crash reporting tools like Firebase Crashlytics can help identify and fix issues that affect application stability, leading to improved user experiences.
User behavior analysis is essential to understand how users interact with the application and identify areas where performance can be improved. By analyzing user interactions, developers can pinpoint bottlenecks and optimize features that are critical to user satisfaction. Tools like Google Analytics and Mixpanel can provide valuable insights into user behavior and application performance.
Adapting to Platform-Specific Guidelines
Each platform has its own set of performance guidelines that developers should adhere to ensure optimal performance. For Android applications, utilizing Jetpack libraries and adhering to Material Design principles can provide consistent performance and a unified user experience. For iOS applications, leveraging native components and optimizing for Apple's Human Interface Guidelines ensures that applications perform optimally on iOS devices.
For cross-platform frameworks like Flutter or React Native, following best practices specific to the framework is essential to achieve native-like performance. Minimizing unnecessary re-renders, using native modules when needed, and leveraging platform-specific optimizations can enhance performance and deliver a seamless user experience across platforms.
Future-Proofing with Emerging Technologies
Staying ahead of technological advancements can provide performance benefits and ensure that applications remain relevant in the ever-evolving digital landscape. Designing applications to take advantage of 5G's high-speed data capabilities can enhance performance by enabling faster data transmission and reduced latency.
Edge computing allows for processing data closer to the user, reducing latency and improving response times. By offloading certain tasks to edge servers, developers can enhance application performance and deliver real-time experiences.
Artificial intelligence can be leveraged to predict user behavior and pre-load content, enhancing perceived performance. Implementing AI-driven features like predictive text input and personalized recommendations can improve user engagement and satisfaction.
Conclusion
In 2025, mobile application performance optimization requires a holistic approach that integrates efficient coding practices, network optimizations, UI enhancements, and proactive monitoring. By staying informed about emerging technologies and adhering to platform-specific guidelines, developers can create applications that deliver exceptional performance and user satisfaction. Implementing these strategies ensures that mobile applications meet the demands of modern users and remain competitive in the dynamic digital landscape.
0 notes
Link
0 notes
Text
Migrating Virtual Machines to Red Hat OpenShift Virtualization with Ansible Automation Platform
As enterprises modernize their IT infrastructure, migrating legacy workloads from traditional hypervisors to cloud-native platforms becomes essential. Red Hat OpenShift Virtualization offers a powerful solution by allowing organizations to run and manage virtual machines (VMs) alongside containers on the same OpenShift cluster. To streamline and scale this migration process, Red Hat Ansible Automation Platform proves to be an invaluable tool.
In this post, we’ll explore how to leverage Ansible Automation Platform to automate the migration of VMs to OpenShift Virtualization, reducing manual effort, minimizing downtime, and increasing consistency across environments.
🧩 What is OpenShift Virtualization?
OpenShift Virtualization, built on KubeVirt, extends Red Hat OpenShift to run traditional VM workloads alongside containerized applications. This allows for:
Unified management of VMs and containers
Seamless integration with CI/CD pipelines
A single pane of glass for observability, networking, and security
🤖 Why Use Ansible for VM Migration?
Manually migrating virtual machines is not only tedious but also error-prone. Ansible Automation Platform enables:
Repeatable Playbooks for consistent VM conversion and deployment
Inventory management of existing VMs and target OpenShift clusters
Idempotent operations that reduce risk and human error
Event-driven automation with Red Hat Event-Driven Ansible (EDA)
🛠️ High-Level Workflow of VM Migration with Ansible
Discovery & Assessment
Identify source VMs using dynamic inventory (e.g., VMware, RHV, KVM)
Collect system configurations and workload details
Use Red Hat Migration Toolkit for Virtualization (MTV) if applicable
Pre-Migration Automation
Validate OpenShift Virtualization setup
Configure storage (e.g., Ceph, CSI volumes)
Prepare networking (e.g., Multus, bridges)
VM Export & Conversion
Use Ansible modules to:
Export VM disks (e.g., via ovftool, virt-v2v, or qemu-img)
Convert formats (e.g., VMDK to QCOW2)
VM Import into OpenShift
Create VM manifests in OpenShift (YAML/CRDs)
Automate virtctl commands or use MTV APIs
Attach appropriate storage and networks
Post-Migration Tasks
Run automated smoke tests
Update DNS or service endpoints
Decommission old VMs (if desired)
🧪 Sample Ansible Playbook Snippet
yaml
- name: Create OpenShift VirtualMachine from template hosts: localhost tasks: - name: Create VM from YAML definition k8s: state: present definition: "{{ lookup('file', 'vm-definition.yaml') }}"
You can integrate this into an Ansible Workflow Job Template in Red Hat Ansible Automation Controller, and trigger it via webhooks or Service Catalogs.
💡 Best Practices
Test in Staging: Simulate migrations in non-prod environments before rolling out to production.
Incremental Migration: Start with low-impact workloads to refine your process.
Logging and Auditing: Use Ansible Tower logs and OpenShift audit logs to monitor changes.
Rollback Plans: Always have a plan to revert if something fails.
🎯 Benefits of Using Ansible + OpenShift Virtualization
Centralized automation of hybrid workloads
Faster time-to-value with reusable playbooks
Simplified management for IT Ops and DevOps teams
Integration with existing CI/CD and ITSM platforms
🔚 Final Thoughts
Migrating VMs to OpenShift Virtualization doesn't have to be complex. By combining the power of Red Hat OpenShift with the flexibility of Ansible Automation Platform, organizations can modernize their workloads efficiently and with confidence.
At HawkStack Technologies, we help enterprises design, automate, and execute seamless VM migration strategies using Red Hat technologies. Contact us to learn how we can support your modernization journey.
📞 Need help with automation or OpenShift Virtualization? Let our certified experts at HawkStack guide your migration from legacy systems to a modern cloud-native environment.
For more details www.hawkstack.com
0 notes
Text
HDD Data Recovery Services

We are most trusted hard disk data recovery companies, and it has been an expert in data recovery for many years. With a high recovery success rate, our data recovery engineers will help you solve various disk errors without losing data. We also offer free diagnosis of the hard drives and can guarantee. HDDs, commonly found in computers and laptops, store data magnetically on spinning disks called platters. Our hard drive recovery services can help you recover data from an HDD that has experienced logical issues, failure, physical damage, or even the formatted HDD - Hard Disk Data Recovery.
Solid-state Drives (SSDs) use flash memory to store data, providing faster access speeds and greater durability due to the lack of moving parts. If you have encountered NAND chip failures, SSD not showing up, or other SSD failures, choosing our recovery services will maximize the chances of successful data retrieval. SD cards are commonly used for digital cameras, smartphones, drones, and other portable electronic devices. Although SD cards are known for their compact size and versatility, they can still encounter issues leading to data loss, such as accidental deletion, format error, file system corruption, etc. Our data recovery services and perform memory card recovery now - SSD Data Recovery.
Data loss in virtual environments can occur due to various reasons, such as virtual machine corruption, accidental deletion, or storage failure. NAS devices are dedicated file storage servers connected to a network, providing multiple users with centralized storage and data access. Our data recovery service can help you recover data from any vendor's device, including but not limited to the following. It is a comprehensive professional service designed to help users recover data lost for various reasons. This service's hallmark is its essential solutions in data loss emergencies, particularly when data recovery software fails to recover data. For more information, please visit our site https://www.nowdatarecovery.com/
0 notes
Text
Virtual Hard disk is a separate disk image ‘file format’ that can store the contents of the physical hard drive, partly or fully. The creation can be done at a location that is preferable to the computer host. The VHD has all the structural elements of the physical hard disk, while it can contain almost all the data from the hard disk, by copying the data files or simply creating new data resources. The types of virtual hard disks include the fixed size and the disk that can have dynamically expanding size. Yet another type is the differencing one, which can be attached to any of the two other types, for increasing the performance of the system. The fixed sized disks do not have to specify for the minimum space required on the computer file system of the host, as it can automatically acquire the required space. On the other hand, dynamically expanding VHDs will take up the required space, according to their need. (Rouse) Virtual Hard Disk drives are the best alternative, when conducting cost-effective operations on computer systems. Using VHD, diverse operating systems can be loaded on the same PC, which allows the host to run different software programs on the same computer, while allowing the software developers to test their programs in a cost-effective manner. During February, 2013 Microsoft purchased the Virtual Hard Disk software from Connectix Virtual PC Software, which was originally responsible for creation of this software. Thereafter, Microsoft renamed this product as Microsoft Virtual PC. (VHD) Virtual Hard disk Formats Apart from the fixed and dynamic formats, as mentioned above, there is another format of VHD called ‘Differencing’ type. Each format can perform different tasks, as they vary in performance. Fixed size VHD The space required by this type of VHD is allocated on the physical Hard disk storage, while creating the VHD. While the fixed size can be increased, in an offline operation, the software does not support reducing the size. The fixed size characteristic of this type ensures optimum efficiency in operation of the system. However, due to the commitment of space allocated, Read the full article
0 notes
Text
Daemon Tools Ultra 2025 Crack key free Download
DOWNLOAD LINK
DAEMON Tools Ultra is a powerful and feature-rich disk image software for Windows that enables users to create, mount, and manage disk images. It is often used for creating virtual drives and handling image files (such as ISO, IMG, MDX, and more) without the need for physical disks. With a comprehensive set of tools, DAEMON Tools Ultra is widely used by gamers, IT professionals, and general users who need to work with disk images or emulate physical disks virtually.
Key Features of DAEMON Tools Ultra:
Create and Mount Disk Images:
DAEMON Tools Ultra supports creating disk images from physical disks, as well as mounting ISO, MDX, MDS, MDF, and many other image formats onto virtual drives. This enables users to run applications, games, and operating systems directly from disk images without needing the physical disk.
1 note
·
View note
Text
PowerISO Crack With Registration Code 2025
PowerISO is a powerful and versatile disk image utility that enables users to create, edit, mount, and burn ISO files, as well as handle other disk image formats such as BIN, NRG, and CDI. It is particularly useful for users who work with virtual drives, bootable disks, or need to manage large amounts of data within disk image files.PowerISO is often used for tasks like burning software installation discs, creating backups, and managing disk images for virtual machines.
Download Now
Key Features of PowerISO
1. Create ISO Files
Creating ISO Files: PowerISO allows users to create ISO files from physical discs (such as CDs, DVDs, or Blu-ray discs) or from folders and files on their computer. This is useful for creating backups of software, games, or important data.
You can create ISO images from multiple files or directories, making it easy to package files into a single, compressed image.
0 notes
Text


High-resolution simulations explore the physics of star formation
Stars are born in clouds of gas and dust, making it difficult to observe their early development. But researchers at Chalmers have now succeeded in simulating how a star with the mass of the sun absorbs material from the surrounding disk of material—a process called accretion.
The researchers simulated four stars with the same mass but with very different magnetic fields to see how that affected the accretion. The study is published in Astronomy & Astrophysics.
"These are some of the first high-resolution simulations where we explore the middle stage of protostar evolution where most of the star's mass is gathered, and which haven't been studied in this much detail before. Our four simulations cover two months each in the life of a protostar and they took a computational effort equivalent to about 2 million CPU hours to perform," says Brandt Gaches, astronomer at Chalmers.
One of many unanswered questions in astronomy is how newborn stars—protostars—accrete mass from their surrounding clouds of gas. While new and updated telescopes have increased their observational capabilities, theoretical models of the process have been lacking. To explore the early days—or the early hundreds of thousands of years to be more correct—of star formation, Brandt Gaches and colleagues decided to create detailed simulations.
"The main, fundamental question was: How do early protostars accrete their mass? There have been a few models proposed for different types of protostars, but we wanted to start from scratch and ask: For a protostar with similar mass to the sun, how would different magnetic field strengths affect the accretion process? Does it fundamentally change things, or is the difference marginal?" says Gaches, a Cosmic Origins Fellow at Chalmers University of Technology.
Focus on magnetic fields
The magnetic field can vary a lot depending on which material the star has gathered from the surrounding clouds. The surface magnetic field strength of young protostars is not well constrained, and when and how they gain their magnetic fields is not well known. However, their magnetic fields should play a significant role in how they grow their mass and interact with their natal environment.
To get a closer look at how the magnetic fields impact the accretion rate, the researchers modeled four protostars, with the mass and gravity like our sun, but where the magnetic fields range from 10 Gauss—also roughly the same as our sun—to 2,000 Gauss. The goal was to see if and how the magnetic fields influenced how the star accretes material from the surrounding disk.
"In the 10 Gauss case, where the protostar is weakly magnetized, we can see that the gas flows freely from the disk directly to the surface of the protostar. We can also observe that a lot of material is ejected from the star's poles.
"In the highly magnetized case (2,000 Gauss), the protostar's magnetic field is strong enough to cut off the disk, stopping the direct gas flow. Instead, gas only flows along the magnetic field lines that connect the disk to the protostar, in areas closer to the poles. The matter prefers to follow the field lines, creating a much more defined flow—with virtually no material escaping from the poles," says Gaches.
Sudden bursts of accretion
But even if the process looks a lot different in the two extremes, there is not a huge difference in the amount of material that the stars accrete—the difference instead lies in how the material accretes over the two months of simulations.
"In the 10 Gauss case, the accretion rate is highly variable, fluctuating at a rate by factors of up to 10 over hourly timescales. This is because material is essentially raining down chaotically," says Gaches.
As the magnetic fields increase in the 500 and 1,000 Gauss simulations, the gas flows become more stable, as the magnetic field helps organize the flow and reduce variability. But at 2,000 Gauss, the variability reappears, in a very different way. Most of the material flow along the field lines towards the star's poles, in an orderly fashion.
But now and then the simulations also show a build-up of material that crashes directly into the star in sudden and irregular bursts. This is due to gas piling up at the magnetic boundary and eventually pushes through, creating the bursts of accretion.
"We expected a more continuous flow of material along the magnetic field lines, so these spikes in the accretion rate was unexpected," says Brandt.
"The simulations also showed, surprisingly, that regardless of the mode of accretion, the fraction of the surface of the protostar onto which the majority of the gas falls does not change much on average."
More work to come on the physics on star formation
"We think these simulations motivate further observations of magnetic fields in protostars, and that our simulations can be of great help when interpreting such observations of the accretion process."
The simulations will be extended in future work for a broader look at the physics of star formation. The high resolution and long timeline make it able to explore a wide range of interesting protostellar physics.
"One of the key goals of these simulations was to generate a large dataset to explore the physics of star formation. Each model has around 3,000 single images spread out over a time period of 60 days. This gives us high time and spatial resolution, allowing us to piece together detailed information."
TOP IMAGE: The new simulations show a cross section of the star and its surrounding disk of gas. In the left image, where the young star is weakly magnetized, gas can be seen flowing freely from the surrounding disk of material to the surface of the protostar. In the right image, material flows along the magnetic field lines towards the star's poles, in a much more defined flow. Credit: Astronomy & Astrophysics (2024). DOI: 10.1051/0004-6361/202451842
LOWER IMAGE: The graphs showing accretion rates for the four different protostellar magnetic fields. The "spiky" green graph for the strongest magnetic field (2,000 Gauss) shows the sudden bursts of accretion clearly. Credit: Astronomy & Astrophysics (2024). DOI: 10.1051/0004-6361/202451842
2 notes
·
View notes
Text
WinBin2Iso Crack 2025 + License Key Free Download [Latest]
DOWNLOAD LINK
WinBin2Iso is a lightweight and straightforward tool designed to convert BIN image files to ISO format. BIN files are often used as disk images and typically contain the contents of a CD or DVD, but they might not be as universally compatible as ISO files. WinBin2Iso allows users to easily convert these BIN files into the more commonly used ISO format, which can then be used for mounting, burning to disc, or creating virtual drives.
Key Features of WinBin2Iso:
Convert BIN to ISO:
The primary function of WinBin2Iso is to convert BIN disk image files into ISO format. ISO files are a widely accepted format for disk images and are compatible with most burning software and virtual drive applications.
Simple Interface:
0 notes